Sound on a MacBook does not behave like a single, predictable control. One moment it stays quiet, the next it responds to calls, apps, or system alerts from different directions.
That happens because macOS separates sound into multiple layers instead of one unified switch. Calls, notifications, and system effects each follow their own path.
The sections below break down simple ways to manage or stop those sounds using built-in settings and quick controls that fit everyday use without confusion.
Why MacBook Has No Dedicated Ringer Toggle?
MacBook doesn’t rely on a single ringer control because macOS splits sound handling across multiple layers rather than grouping everything under one switch.
- FaceTime calls follow their own app-based audio behavior, separate from system-wide sound controls
- Notifications are managed through macOS settings, with each app defining how alerts appear and sound
- System effects like clicks, alerts, and interface sounds operate independently from app notifications
- Every application can define its own alert style, timing, and sound output rather than sharing a universal setting
How to Turn Ringer Off on MacBook? Fastest Ways to Silence MacBook Alerts
Below are clear methods that help stop or reduce alerts on MacBook without affecting essential use:
1. Use Silent Mode / Mute Key
![]()
This is the quickest way to stop all system sound output. It works instantly and does not require opening settings.
Steps:
- Look at the top row of the MacBook keyboard
- Find the F10 key or speaker icon with sound waves
- Press it once to mute system audio
- Check the screen indicator showing sound level is off
What it does:
- Stops system-wide audio output immediately
- Works across apps like Safari, Music, and video players
- Does not fully stop visual notifications
- Useful when sound needs to be cut in one action
2. Lower Alert Volume in Sound Settings
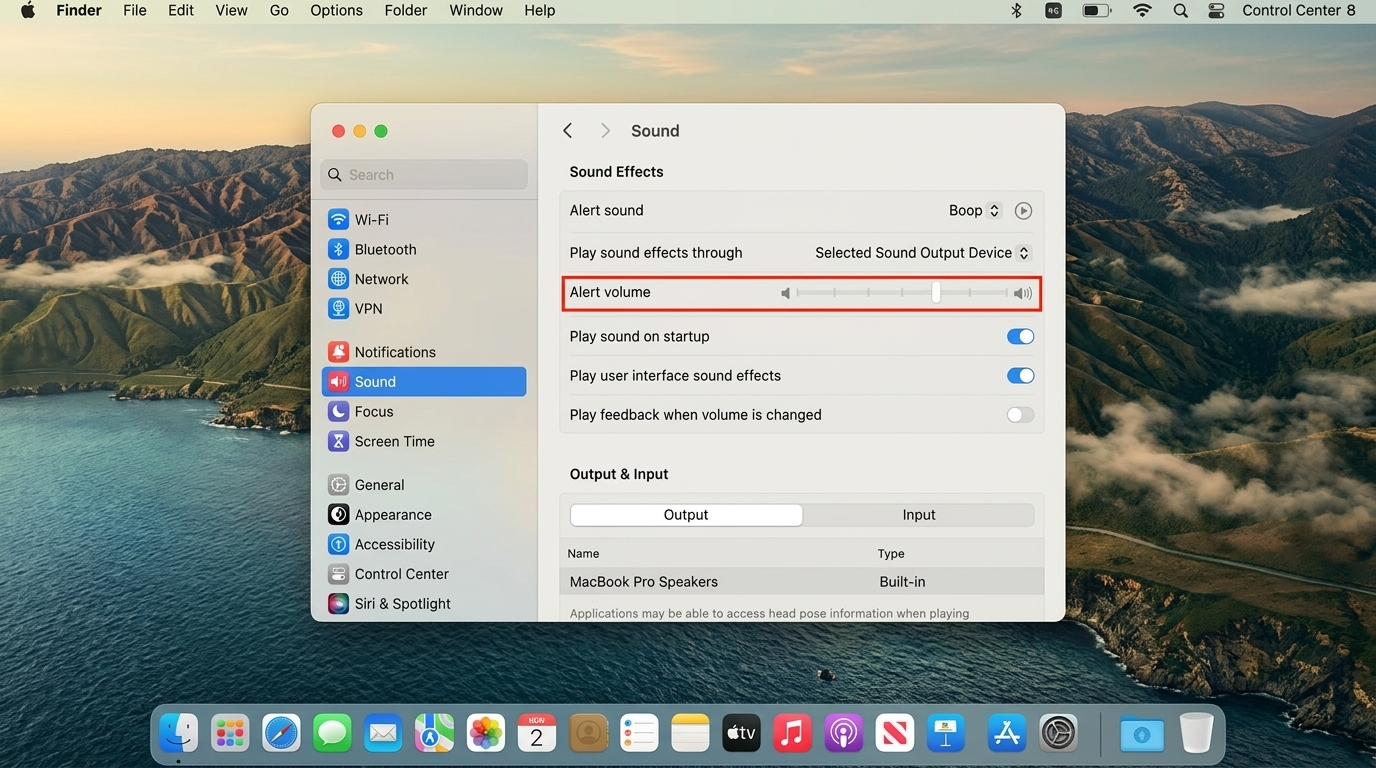
This option reduces how loud system alerts feel while keeping media playback separate and usable.
Steps:
- Click Apple menu in top-left corner
- Open System Settings
- Go to Sound section
- Find “Alert volume” slider
- Drag slider fully left or to a low level
- Close settings to save changes automatically
What it does:
- Controls only alert sound, not music or video
- Keeps media playback volume independent
- Reduces notification sound without full mute
- Good for regular daily use
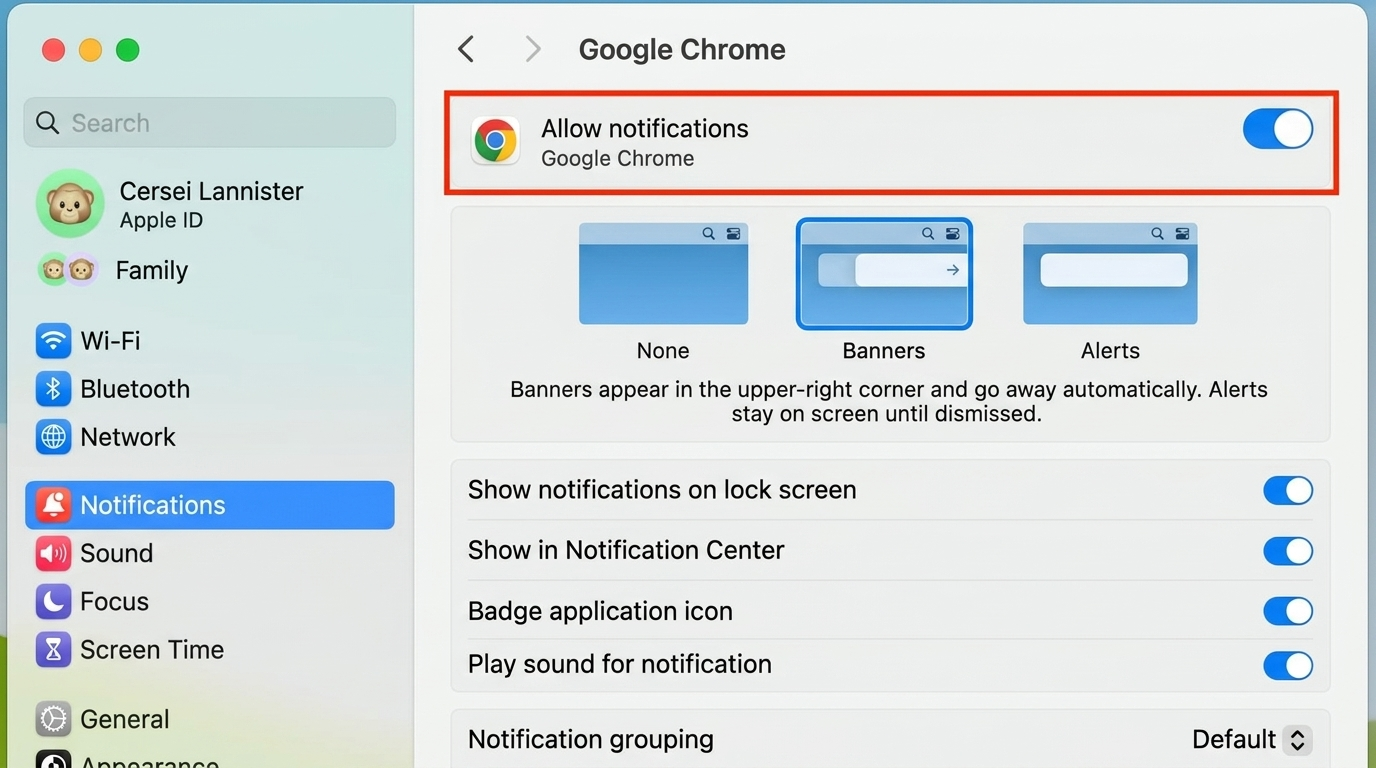
3. Turn Off Notification Sounds from System Settings
![]()
macOS allows turning off notification audio while keeping visual alerts active.
Steps:
- Open Apple menu
- Go to System Settings
- Click Notifications in sidebar
- Turn off “Play sound for notifications” toggle
- Scroll through apps list
- Open important apps and adjust their alert settings individually
What it does:
- Stops most app notification sounds
- Keeps banners or alerts visible if needed
- Allows per-app customization
- Helps reduce constant interruptions from multiple apps
4. Use Focus Modes to Block Alerts Completely

Focus Mode works as a filter that controls which notifications and calls are allowed during specific time periods.
Steps:
- Open System Settings
- Select Focus option
- Click a preset like Work, Sleep, or Personal
- Or create a new Focus mode
- Add allowed contacts and apps only
- Enable “Silence Notifications” for others
- Set schedule if automatic activation is needed
What it does:
- Blocks calls and notifications outside allowed list
- Works across all apps at system level
- Can run on schedule or manually
- Ideal for work, study, or meetings
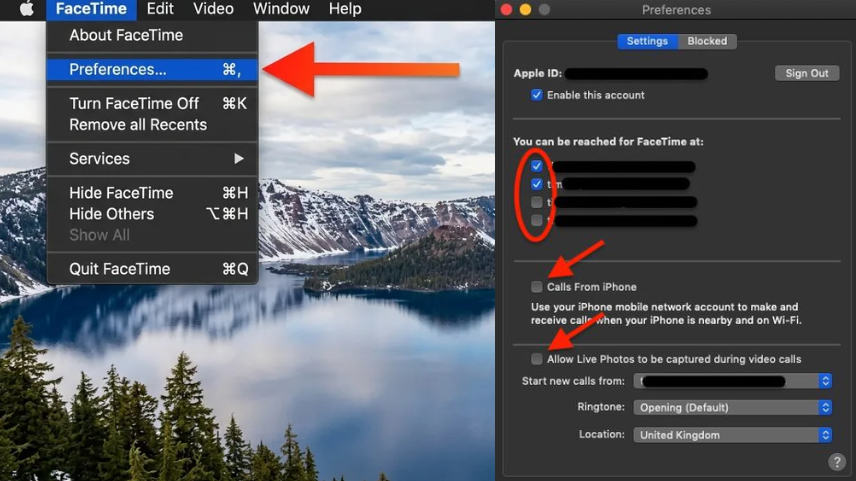
5. Stop Incoming Call Sounds (FaceTime + iPhone Calls)
MacBook can ring due to FaceTime or iPhone continuity calls, which need separate control.
FaceTime Steps
- Open FaceTime app
- Click FaceTime in menu bar
- Select Settings or Preferences
- Turn off FaceTime account or sign out
- Close app
iPhone Call Steps
- Open System Settings
- Click FaceTime section
- Find “Calls from iPhone” option
- Toggle it off
- Exit settings
What it does:
- Stops FaceTime call ringing on MacBook
- Blocks iPhone calls syncing to Mac
- Reduces unexpected call interruptions
- Works independently from system mute
6. Per-App Notification Control
Each application controls its own alert behavior, so settings must be adjusted one by one.
Steps:
- Open System Settings
- Click Notifications
- Select any app from the list
- Turn off “Allow Notifications” or disable sound
- Adjust banner style if needed
- Repeat for other apps like Messages, Mail, or browser
What it does:
- Stops alerts only for selected apps
- Keeps important apps active if required
- Gives full control over notification noise
- Helps reduce overload from messaging and email apps
7. Disable System Sounds Without Affecting Media
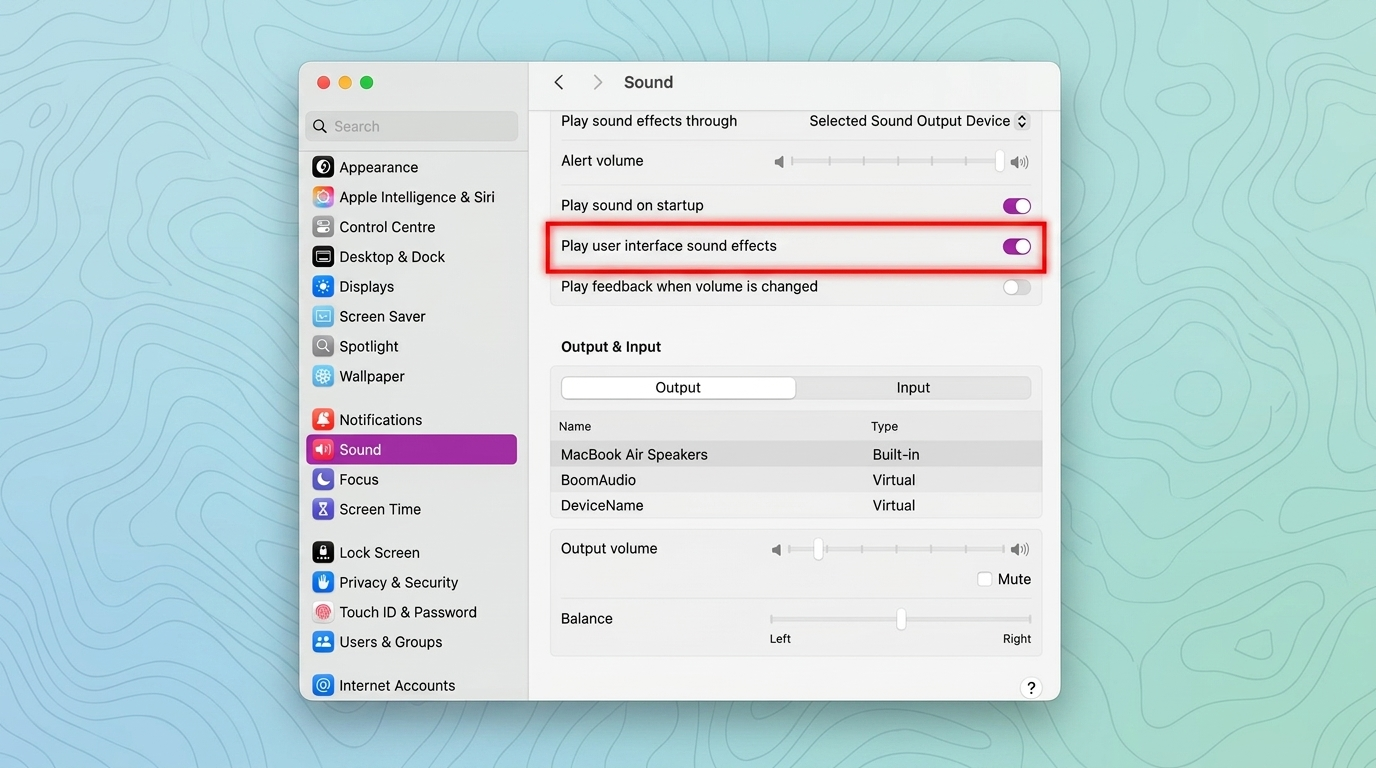
This removes small system noises like clicks and alerts while keeping media playback unchanged.
Steps:
- Open System Settings
- Go to Sound section
- Scroll to “Sound Effects” area
- Turn off “Play user interface sound effects”
- Exit settings
What it does:
- Removes system click sounds
- Keeps music, video, and streaming audio active
- Reduces background system noise
- Improves quiet working environment
8. Advanced Method: Terminal-Based Silent Mode (Optional)
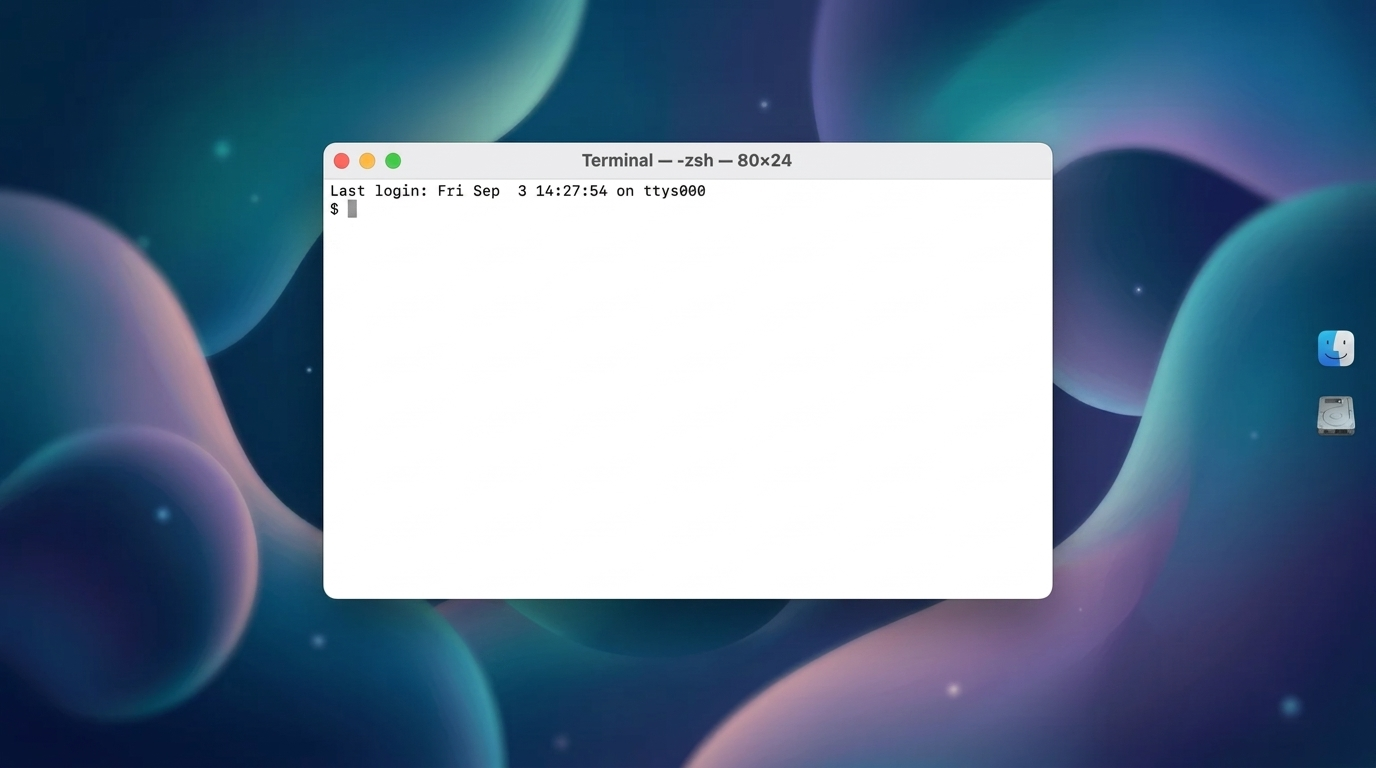
This method is for deeper system-level control and affects how macOS handles audio alerts.
Steps:
- Open Spotlight search
- Type Terminal and open it
- Enter system sound control command based on macOS version
- Press Enter to apply changes
- Restart Mac if changes do not apply immediately
What it does:
- Controls system-level alert behavior
- Works beyond standard settings menu
- Useful for advanced users
- Can fully suppress certain system sounds
Quick Comparison of Methods
Each method controls MacBook sound in a different way, depending on whether the goal is instant silence, selective control, or full system-level adjustment.
| Method | What It Controls | Best Use Case | Difficulty |
| Mute Key (F10) | System audio output | Instant silence during meetings or focus moments | Very easy |
| Alert Volume Slider | Notification and system alert loudness | Reducing sound without full mute | Easy |
| Notification Settings | App-level notification sounds and banners | Managing which apps can make noise | Easy |
| Focus Mode | Calls, alerts, and notifications based on rules | Work, study, or distraction-free periods | Moderate |
| FaceTime Settings | Incoming FaceTime and call alerts | Stopping call interruptions on MacBook | Easy |
| Per-App Controls | Individual app notification behavior | Fine-tuning specific apps only | Easy |
| System Sound Effects Toggle | UI clicks and minor system sounds | Quiet system feedback while keeping media active | Easy |
| Terminal Method | System-level alert behavior | Advanced control beyond settings UI | Complex |
Ending Note
MacBook sound control depends on layered settings, so there is no single switch that handles everything at once. Each method shown above targets a different source of audio, from calls to system effects, giving flexible control based on situation and usage style.
Small changes in settings can make a noticeable difference in how quiet or active the device feels during daily work.
If one of these methods worked better than others or if a different setup is used to manage alerts, share it in the comments.
Real use cases often reveal simpler combinations that make MacBook sound behavior easier to handle.
Frequently Asked Questions
How Do I Know if Silent Mode Is On?
Silent mode on iPhone can be checked by the crossed-out bell icon in the status bar or the highlighted silent indicator in Control Center. Older models show an orange strip on the side switch, while newer iPhones confirm status via Action Button feedback or Dynamic Island alerts.
Should Silent Mode Be on Or Off?
Whether to keep the silent mode on or off depends entirely on your current environment and personal preference. Keeping it on avoids distracting others and prevents unexpected interruptions, while having it off ensures you never miss urgent calls or notifications.
What iPhone Not to Buy?
When shopping for an iPhone, you should avoid unsupported models (iPhone XS and older), devices with 64GB or less of storage, and battery-draining “mini” variants. These older or limited devices suffer from degraded performance, lack vital security updates, and fill up almost instantly.